pdfcpu
A PDF processor written in Go.
View the Project on GitHub pdfcpu/pdfcpu
Changelog
Booklet
is a useful variation of the N-up command.
-
Arrange a sequence of pages of
inFileonto larger sheets of paper for a small book or zine and write the result tooutFile. -
Create your booklet or zine out of a sequence of image files.
-
Optionally set the sheet background color and render guidelines for folding and cutting.
-
Have a look at some examples.
Usage
pdfcpu booklet [-p(ages) selectedPages] -- [description] outFile n inFile|imageFiles...
Flags
| name | description | required |
|---|---|---|
| p(ages) | selected pages | no |
Common Flags
Arguments
| name | description | required | values |
|---|---|---|---|
| description | configuration string | no | |
| outFile | PDF output file | yes | |
| n | the N-up value | yes | 2, 4, 6, 8 |
| inFile | PDF input file | inFile or imageFile(s) | |
| imageFile… | one or more images | inFile or imageFile(s) |
There are many styles of booklet you can choose from, depending on the page size and orientation of your booklet or zine, the sheet size of the paper you will be printing on, and the method you will be using for assembling.
N-up Value
The n-up value will be how many pages of your booklet will fit on one side of the sheet you will be printing on. The following options are available:
| n-up | portrait | landscape |
|---|---|---|
| 2 | 1x2, long-edge only | 2x1, long-edge only |
| 4 | 2x2 | 2x2 |
| 6 | 2x3, long-edge only | — |
| 8 | 2x4 (all long-edge) | 4x2 (all short-edge) |
n=2
This is the simplest case and the most common for those printing at home. Two of your pages fit on one side of a sheet (eg statement on letter, A5 on A4). Assemble by printing on both sides (odd pages on the front and even pages on the back), folding down the middle, and binding the booklet with staples, sewing, etc.
n=4
Four of your pages fit on one side of a sheet (eg statement on ledger, A5 on A3, A6 on A4).
When printing 4-up, your booklet can be bound either along the long-edge (for portrait this is the left side of the paper, for landscape the top) or the short-edge (for portrait this is the top of the paper, for landscape the left side).
Using a different binding will change the ordering of the pages on the sheet.
You can set long or short-edge with the binding option.
In 4-up printing, the sets of pages on the bottom of the sheet are rotated so that the cut side of the paper is on the bottom of the booklet for every page (for the default portrait, long-edge binding case. Similar rotation logic applies for the other three orientations). Having the cut edge always on bottom makes for more uniform pages within the book and less work in trimming.
To assemble booklets with the default 4-up binding method (btype=booklet):
- print on both sides
- cut the sheets in half
- arrange the stacks of half sheets for collation in the following order: top half sheet 1, bottom half sheet 1, top half sheet 2, …
- collate the stacks into individual sets of booklets
- fold, bind, and trim (if desired)
Advanced 4-up
The btype=advanced is a special method for assembling, only for 4-up booklets.
Printers that are used to collating first and then cutting may prefer this method.
To assemble:
- print on both sides
- collate the whole sheets
- cut each of the collated sets in half horizontally and place the bottom half (un-rotated) under the top half. Alternately, you can fold each set horizontally and again vertically, then trim the bottom fold off. Both of these methods will produce a correctly ordered booklet.
- bind and trim (if desired)
n=6
Six of your pages fit on one side of a sheet. This produces an unusual sized booklet, but can be an efficient use of paper. To assemble:
- print on both sides
- cut the sheets in thirds horizontally
- arrange the sheet stacks for collation: moving top to bottom, then by sheet (ie top third sheet 1, middle third sheet 1, bottom third sheet 1, top third sheet 2, …)
- collate the stacks into individual sets of booklets
- fold, bind, and trim (if desired)
Only available for portrait, long-edge orientation.
n=8
Eight of your pages fit on one side of a sheet (eg A6 on A3).
For long-edge binding, pages are arranged similar to 4-up with btype=booklet, but with an additonal rotation to fit the pages on the sheet. For short-edge binding, pages are arranged similar to 6-up (left-to-right, top-to-bottom order). To assemble:
- print on both sides
- For long-edge binding: cut the sheets in half horizontally and then cutting those half-sheets in half vertically. For short-edge binding: cut the sheets in quarters horizontally.
- arrange the sheet stacks for collation: moving left to right, then top to bottom, then by sheet (ie top-left sheet 1, top-right sheet 1, middle-left sheet 1, …)
- collate the stacks into individual sets of booklets
- fold, bind, and trim (if desired)
Perfect binding
Perfect binding is a special type of booklet. The main difference is that the binding is glued into the book’s spine,
meaning that all pages are cut from the sheet and not folded as in the other forms of booklet.
This results in a different page ordering on the sheet than the other methods. If you intend to perfect bind your booklet,
use btype:perfectbound. To assemble:
- print on both sides
- cut the sheets in half horizontally and then cutting those half-sheets in half vertically
- arrange the sheet stacks for collation: moving left to right, then top to bottom, then by sheet
- collate the stacks into individual sets of booklets
- perfect bind and trim (if desired)
Multifolio or Signatures
Multifolio or signatures, is a technique used to produce longer booklets.
This technique makes the most sense when your book has at least 128 pages.
For example, you can bind your paper in eight sheet folios (also known as signatures), with each folio containing 32 pages of your book.
For such a multi folio booklet set multifolio:on and play around with foliosize which defaults to 8.
Description
A configuration string to specify the details of the booklet layout.
| parameter | values | default |
|---|---|---|
| dimensions | (width, height) in user units eg. ‘400 200’ | 595 842 |
| formsize, paper size | paper size to be used. Append L or P to enforce landscape/portrait mode | A4 |
| btype | The method for arranging pages into a booklet. (booklet, bookletadvanced, perfectbound) | booklet |
| binding | The edge of the paper which has the binding. (long, short) | long |
| multifolio | on/off true/false, for PDF input only | off |
| foliosize | for multi folio booklets only | 8 |
| guides | on/off true/false | off |
| border | on/off true/false | off |
| margin | float >= 0 | 0 |
| backgroundcolor, bgcol | color | none |
Default description
'formsize:A4, dimensions:595 842, guides:off, border:off, margin:0'
-
You only have to specify any parameter diverging from the default.
-
Only one of dimensions or formsize is allowed.
-
You may use parameter prefixes as long as the parameter can be identified.
Examples
2-up booklet
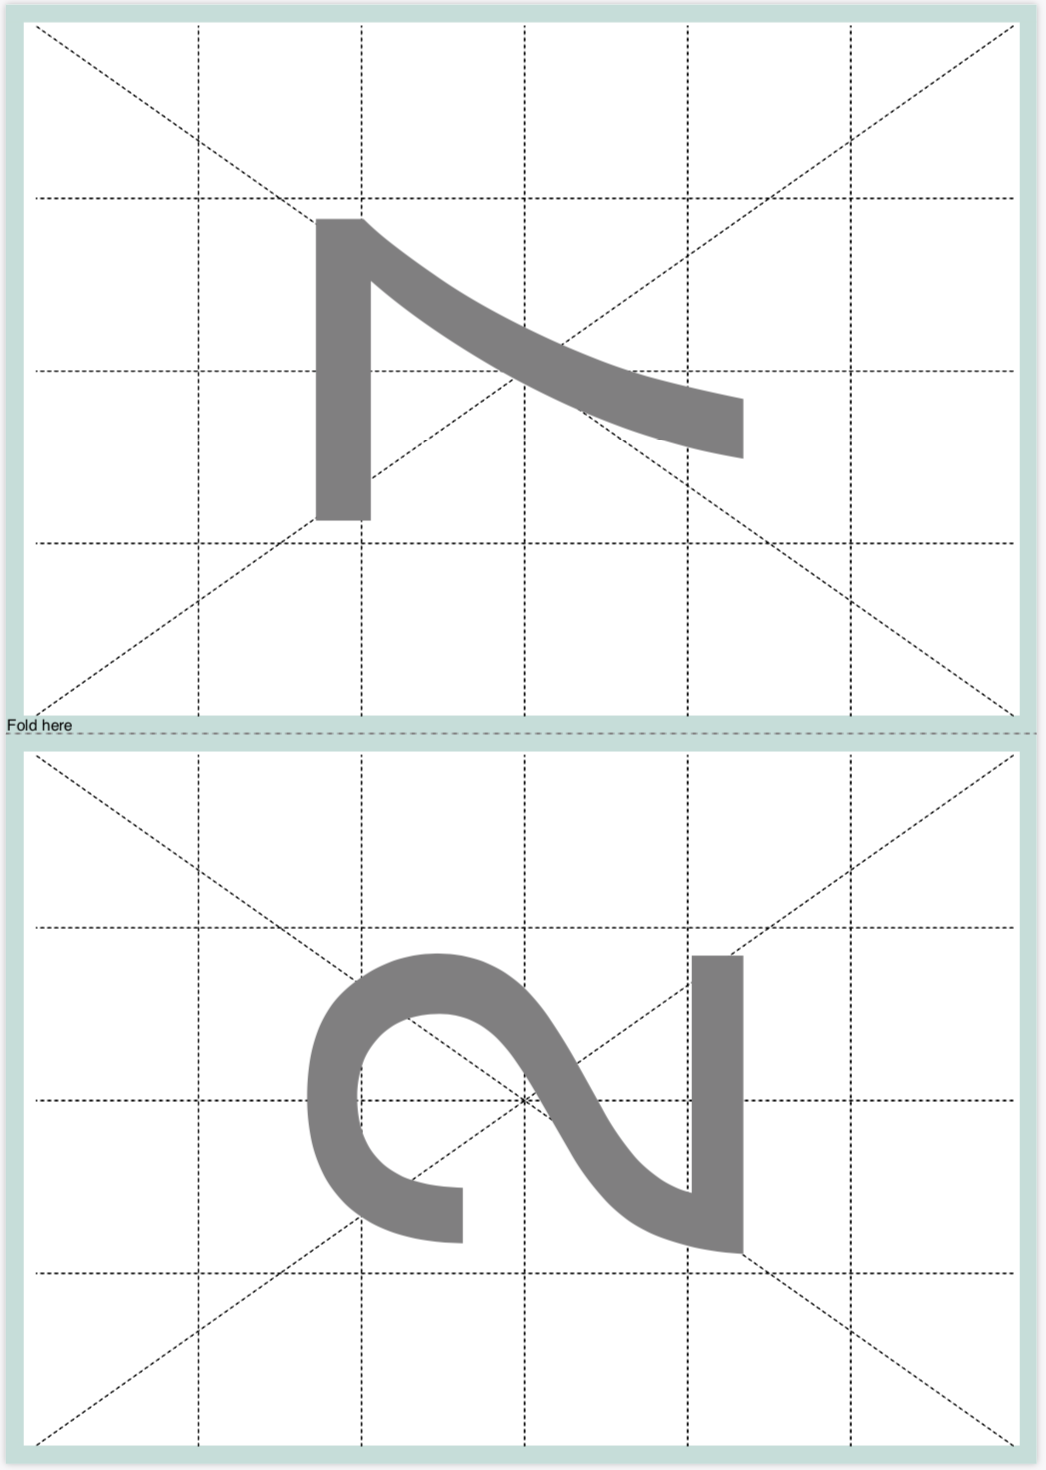
Let’s make a booklet where two of your pages fit on one side of a sheet of paper. We’ll be using A4 so the format of the booklet pages will be A5. This command generates a PDF file representing a sequence of page pairs (front and back side of a sheet of paper). Once generated we need to print the file two-sided and then assemble our booklet by stacking the printed sheets and folding them down the middle:
$ pdfcpu booklet -- "p:A4, border:on" booklet.pdf 2 pageSequence.pdf
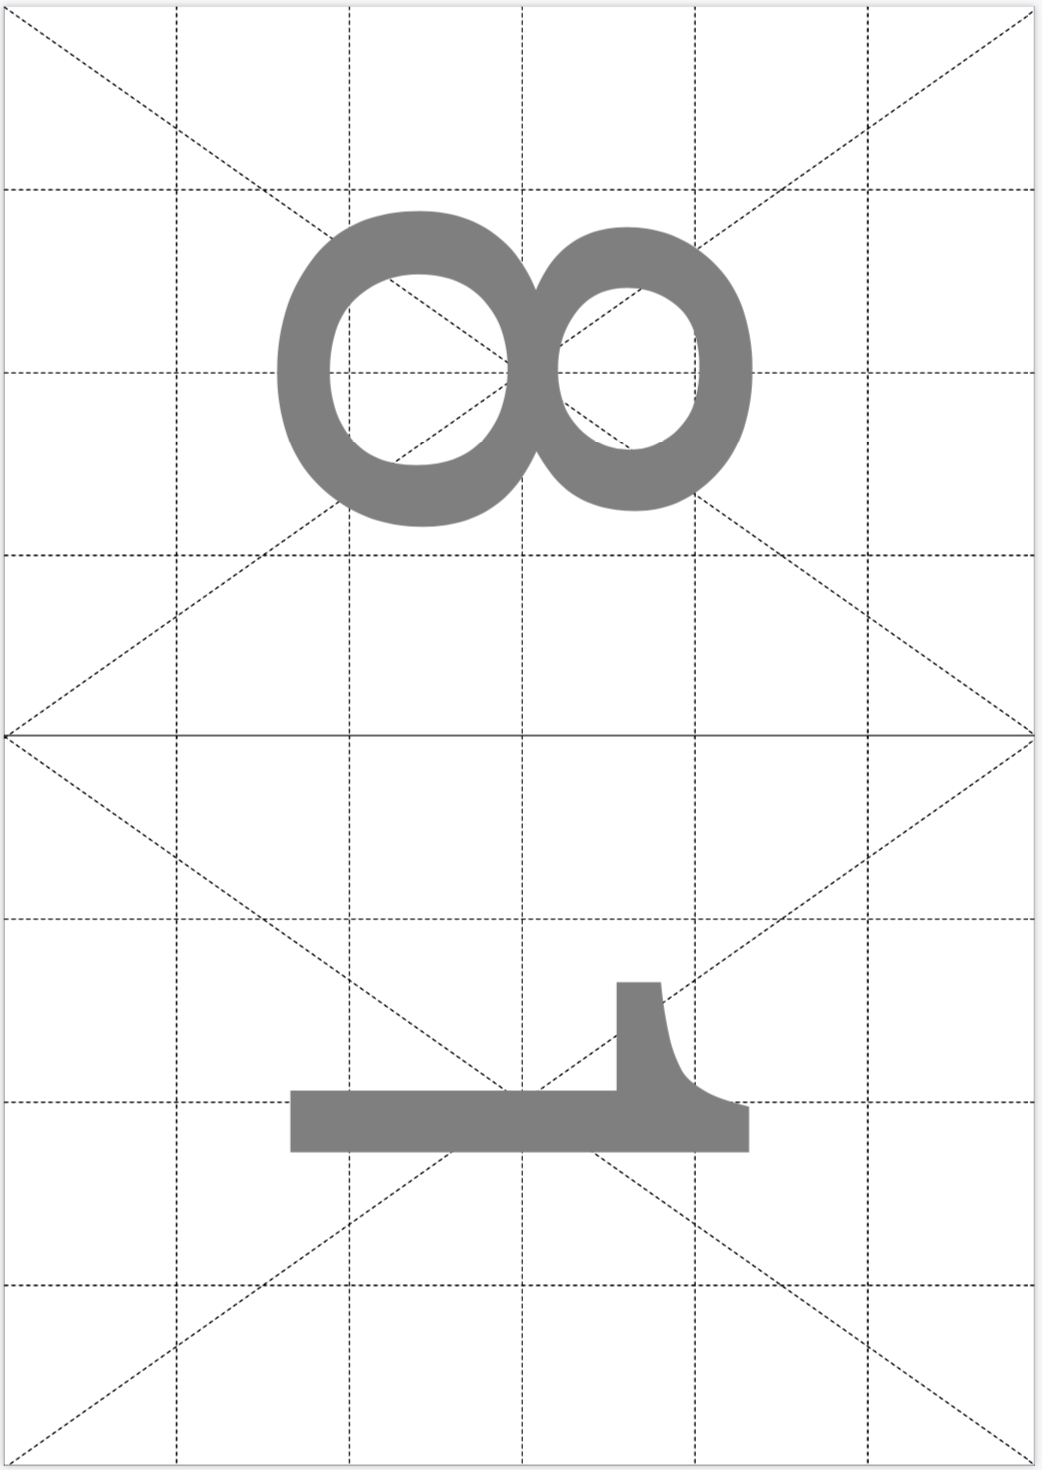
Here is the front and back side of the first printed sheet of paper for an input file with eight pages.
This also explains that four booklet pages fit on one sheet of paper:
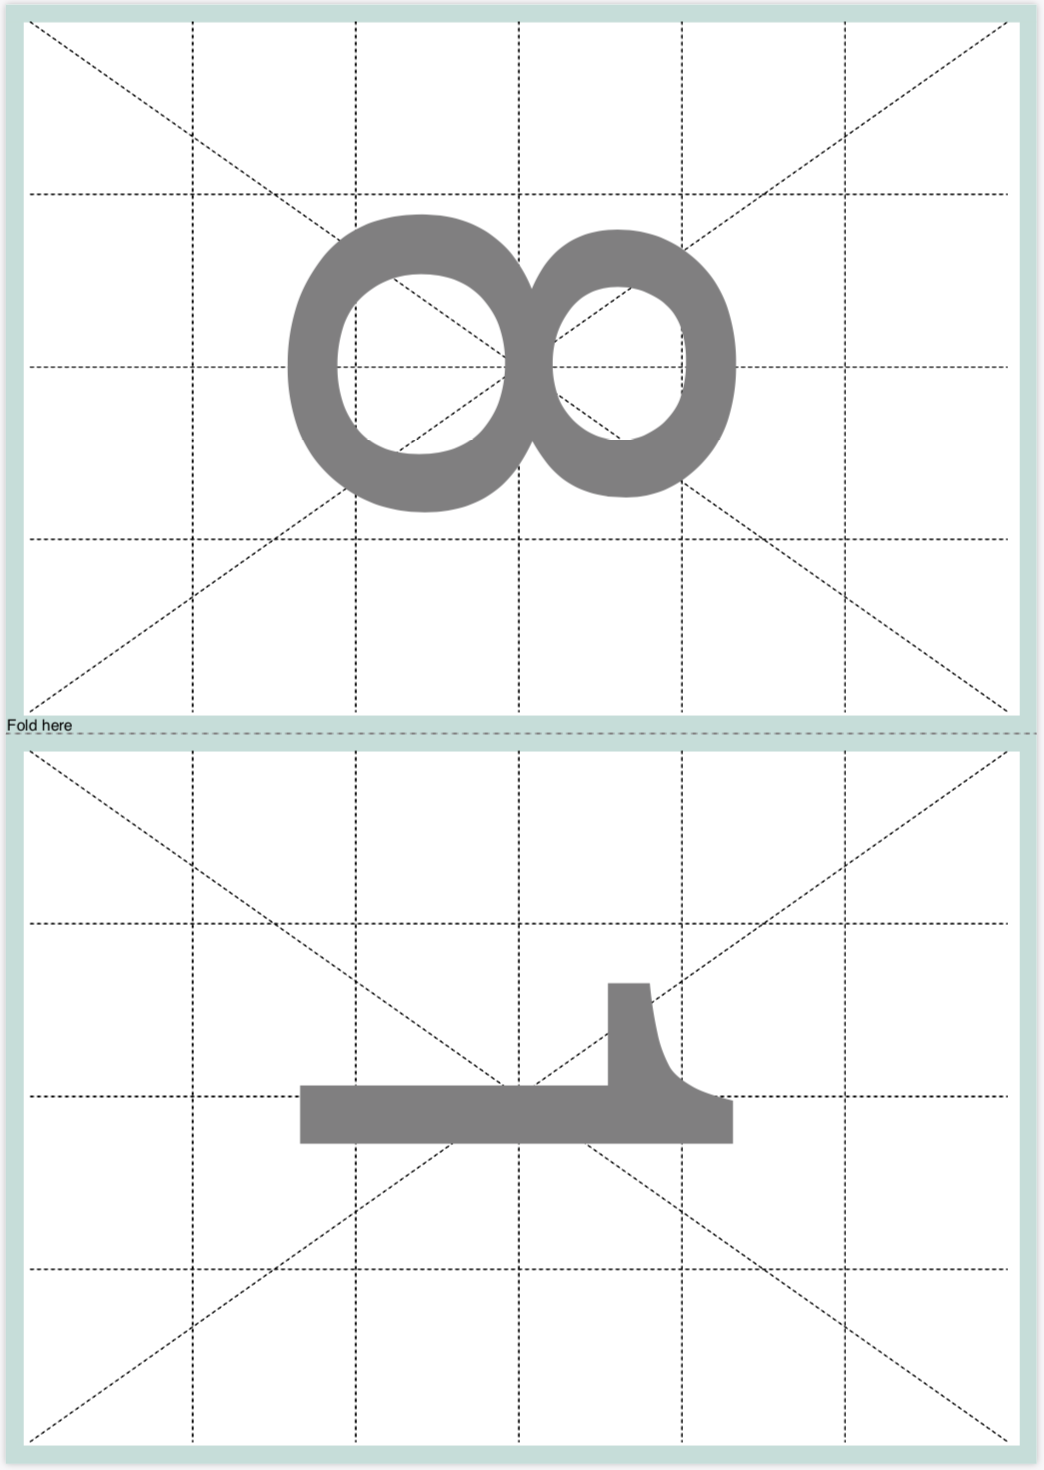
You can also set margins, the sheet background color and you can even render the guidelines for folding:
$ pdfcpu booklet -- "formsize:A4, border:off, guide:on, margin:10, bgcol:#beded9" booklet.pdf 2 pageSequence.pdf
Since A4 happens to be the default form size the following command is identical to the one above:
$ pdfcpu booklet -- "g:on, ma:10, bgcol:#beded9" booklet.pdf 2 pageSequence.pdf
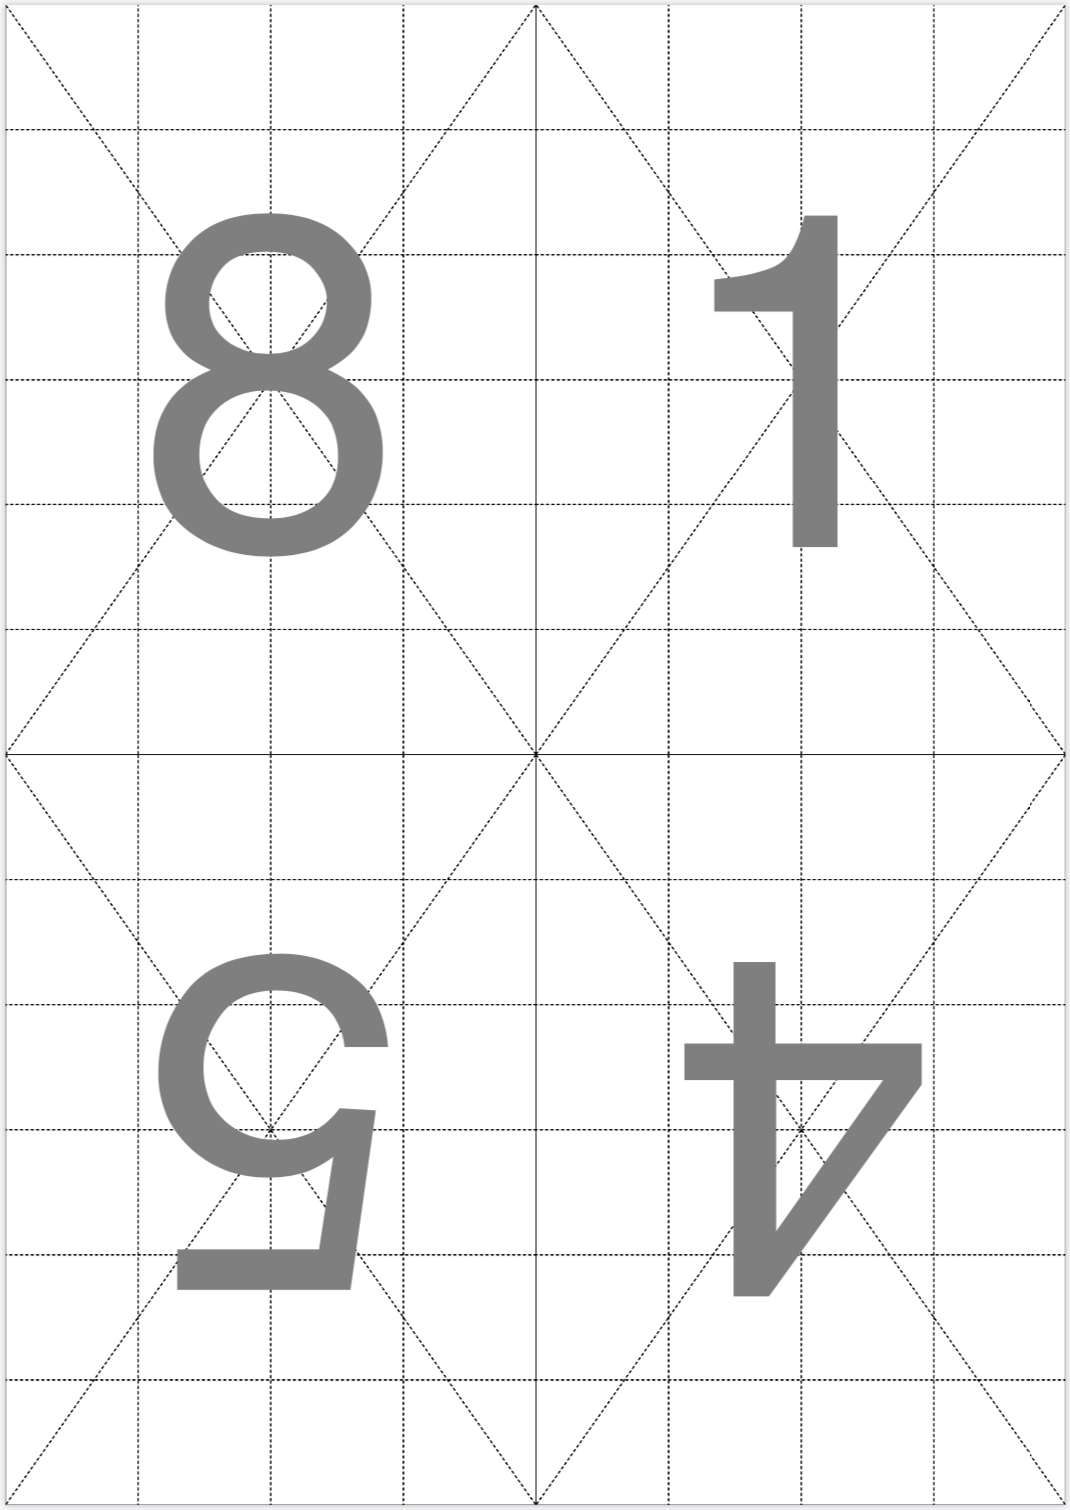
4-up booklet
Now let’s make a little zine also using A4 but now four zine pages shall fit on one sheet of A4 which results in a zine page size of A6.
The assembly stage looks a little bit different here since we will also need to do some cutting. After pdfcpu has generated the PDF which holds our zine first we need to print it using two-sided printing. Then we take the printed stack and cut the sheets horizontally. After cutting, we place the bottom set of pages after the top set of pages in the zine. Then fold the half sheets:
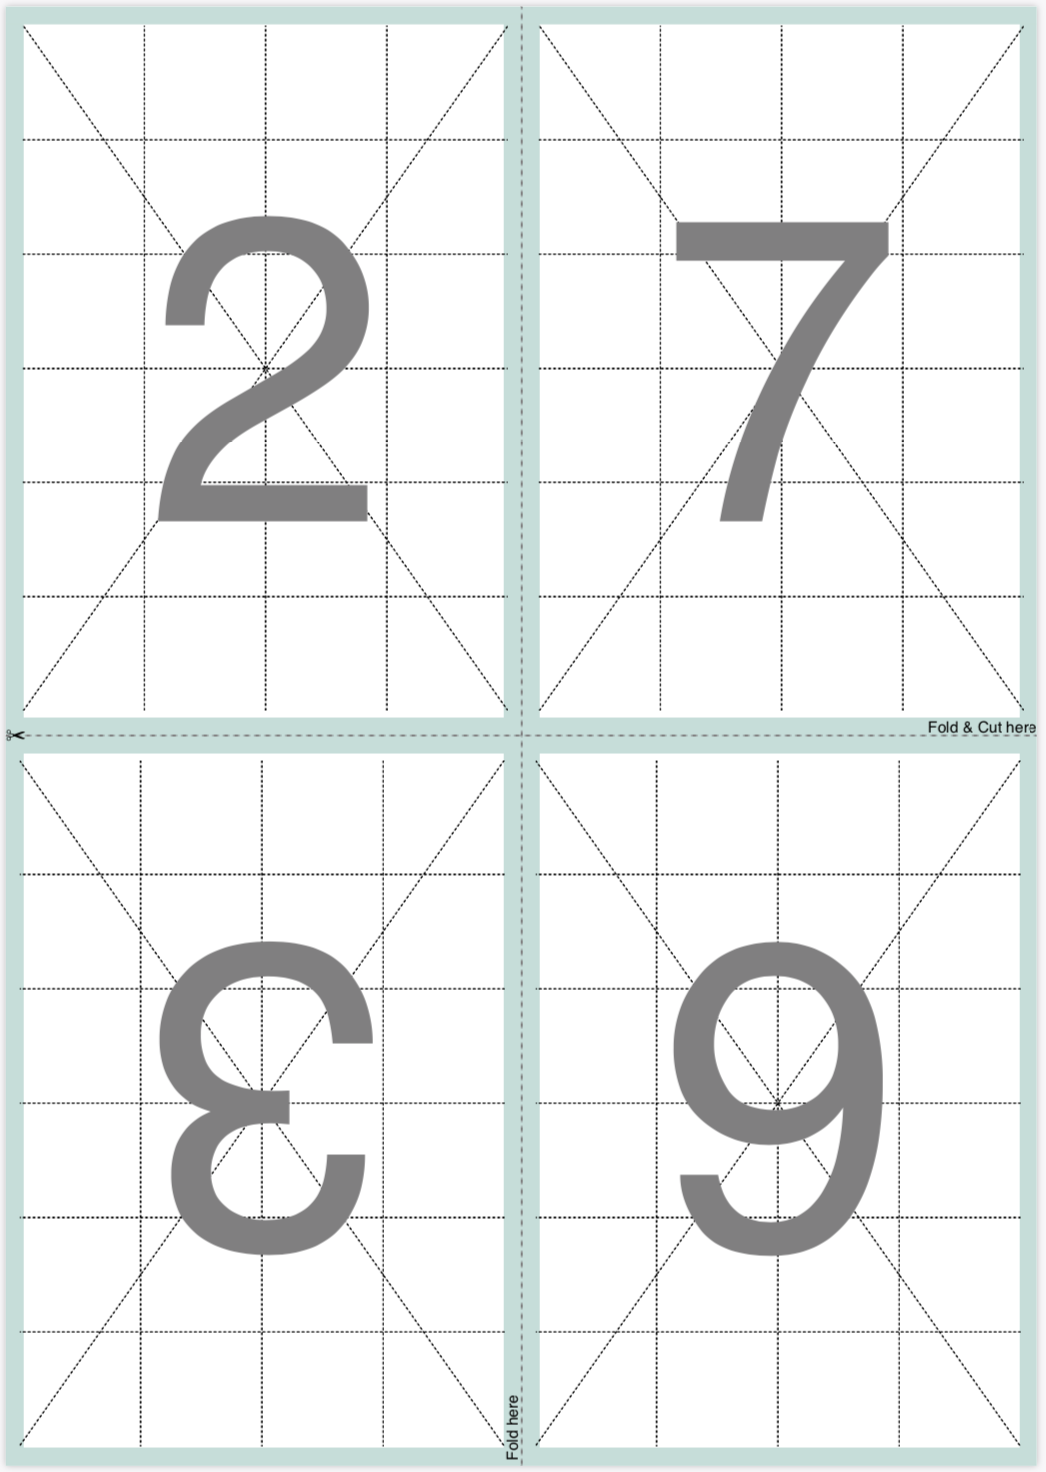
$ pdfcpu booklet -- "p:A4, border:on" zine.pdf 4 pageSequence.pdf
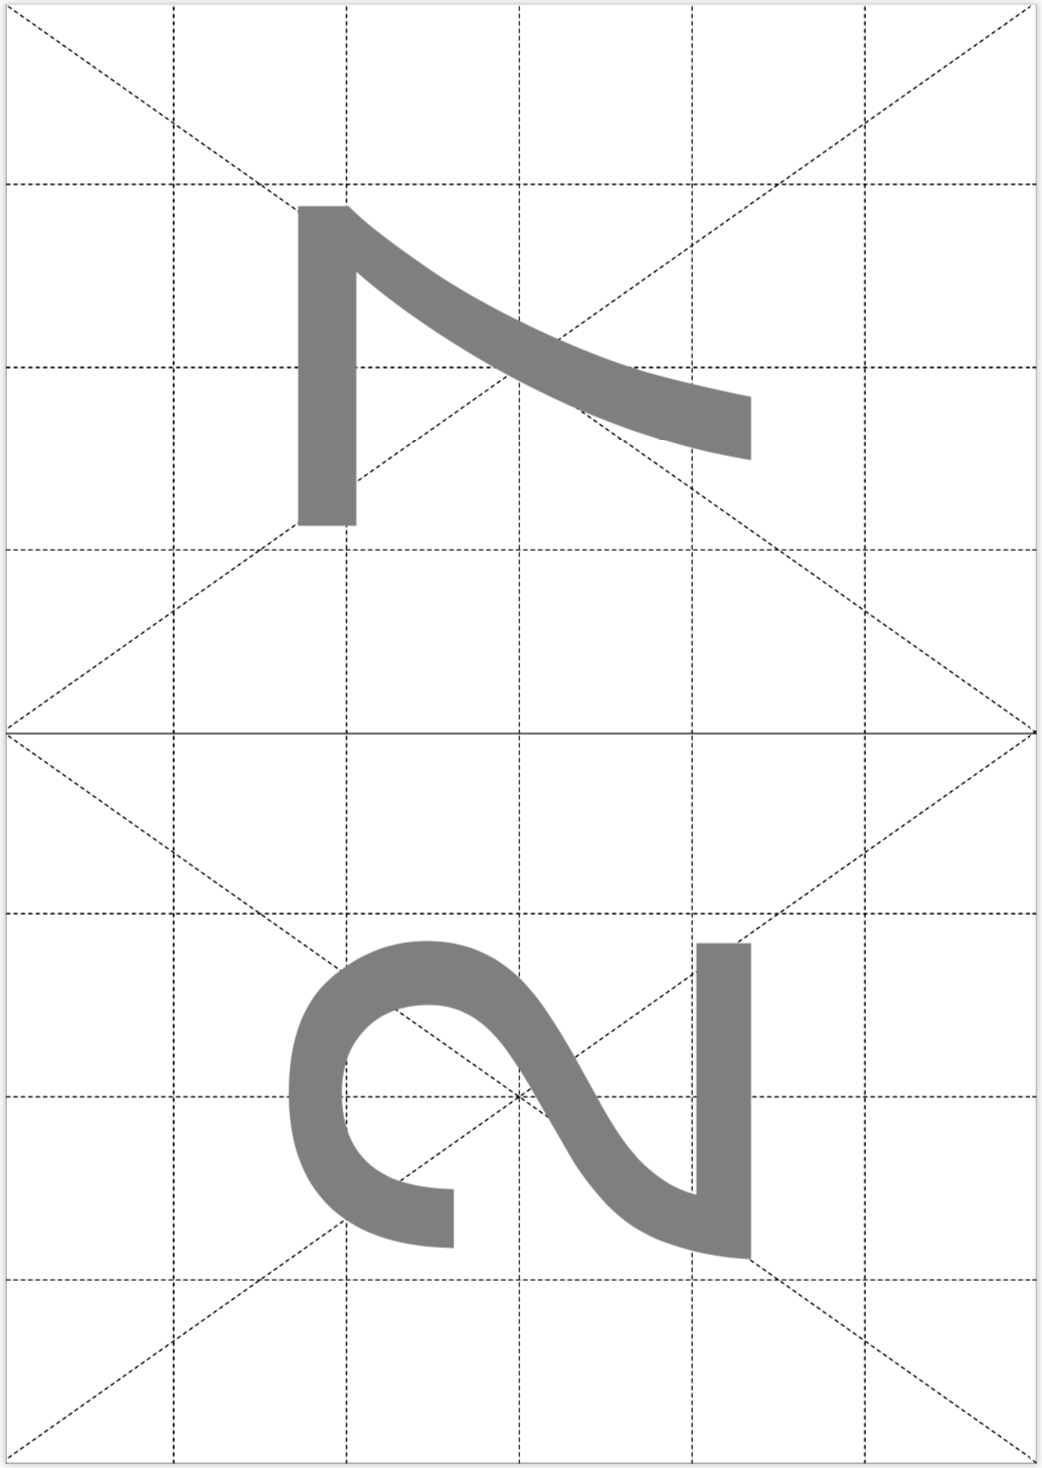
Here are the first two pages representing the front and back side of the first paper sheet:
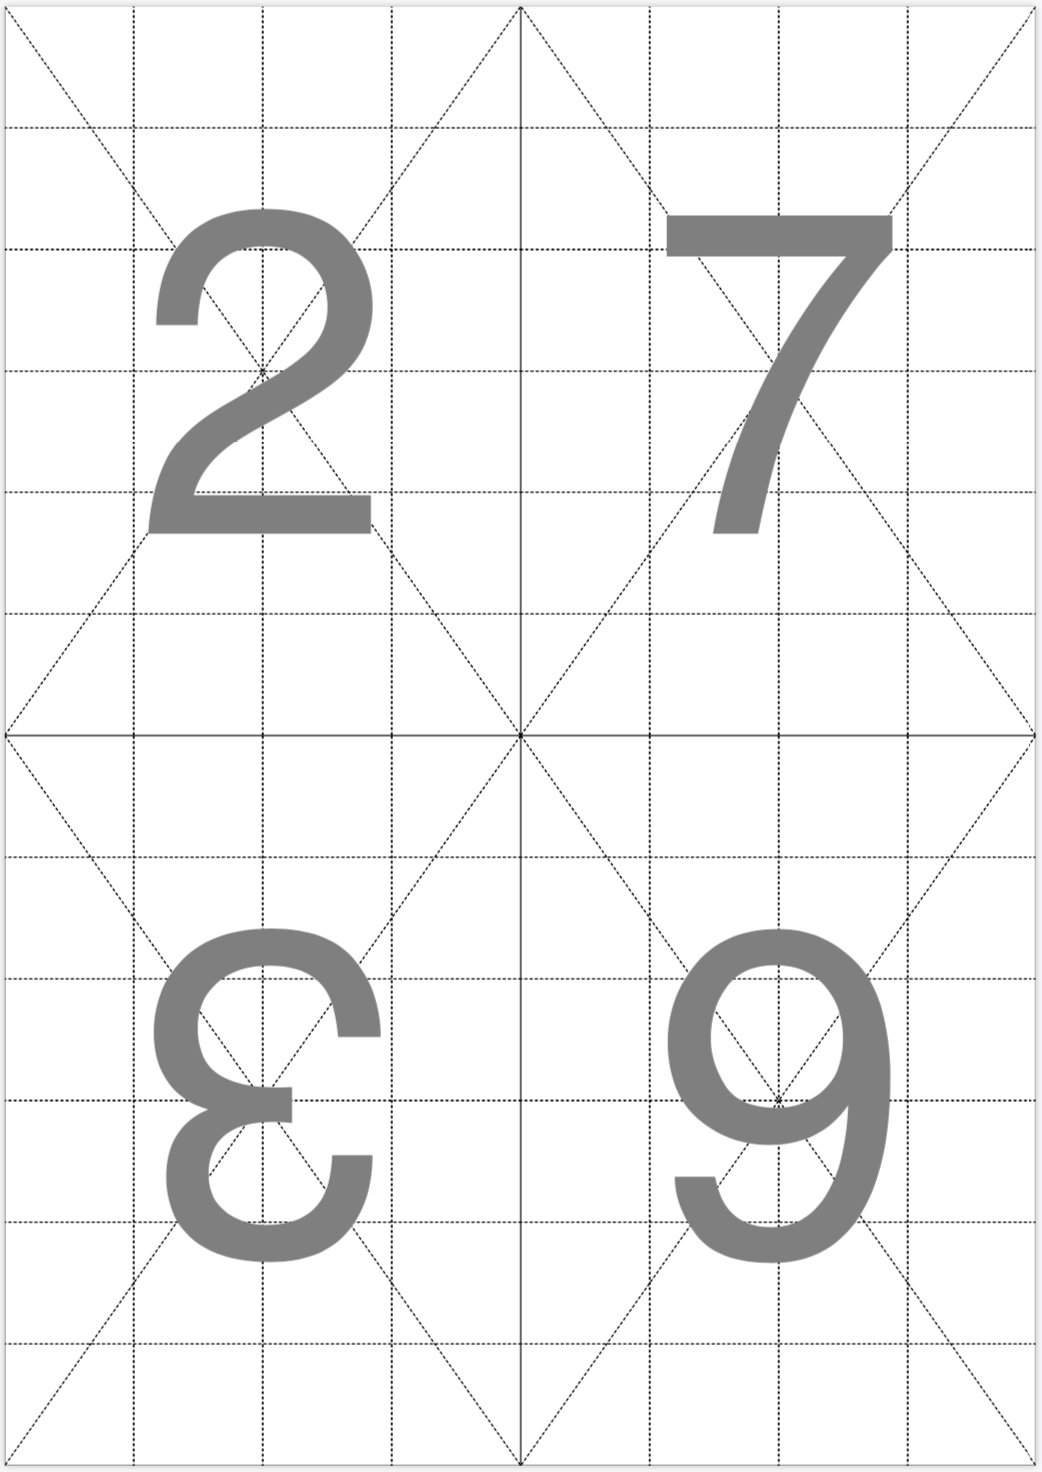
Using guidelines for cutting and folding and a nice combination of margin and background color the assembly steps may be easier to understand:
$ pdfcpu booklet -- "p:A4, bo:off, g:on, ma:10, bgcol:#beded9" zine.pdf 4 pageSequence.pdf
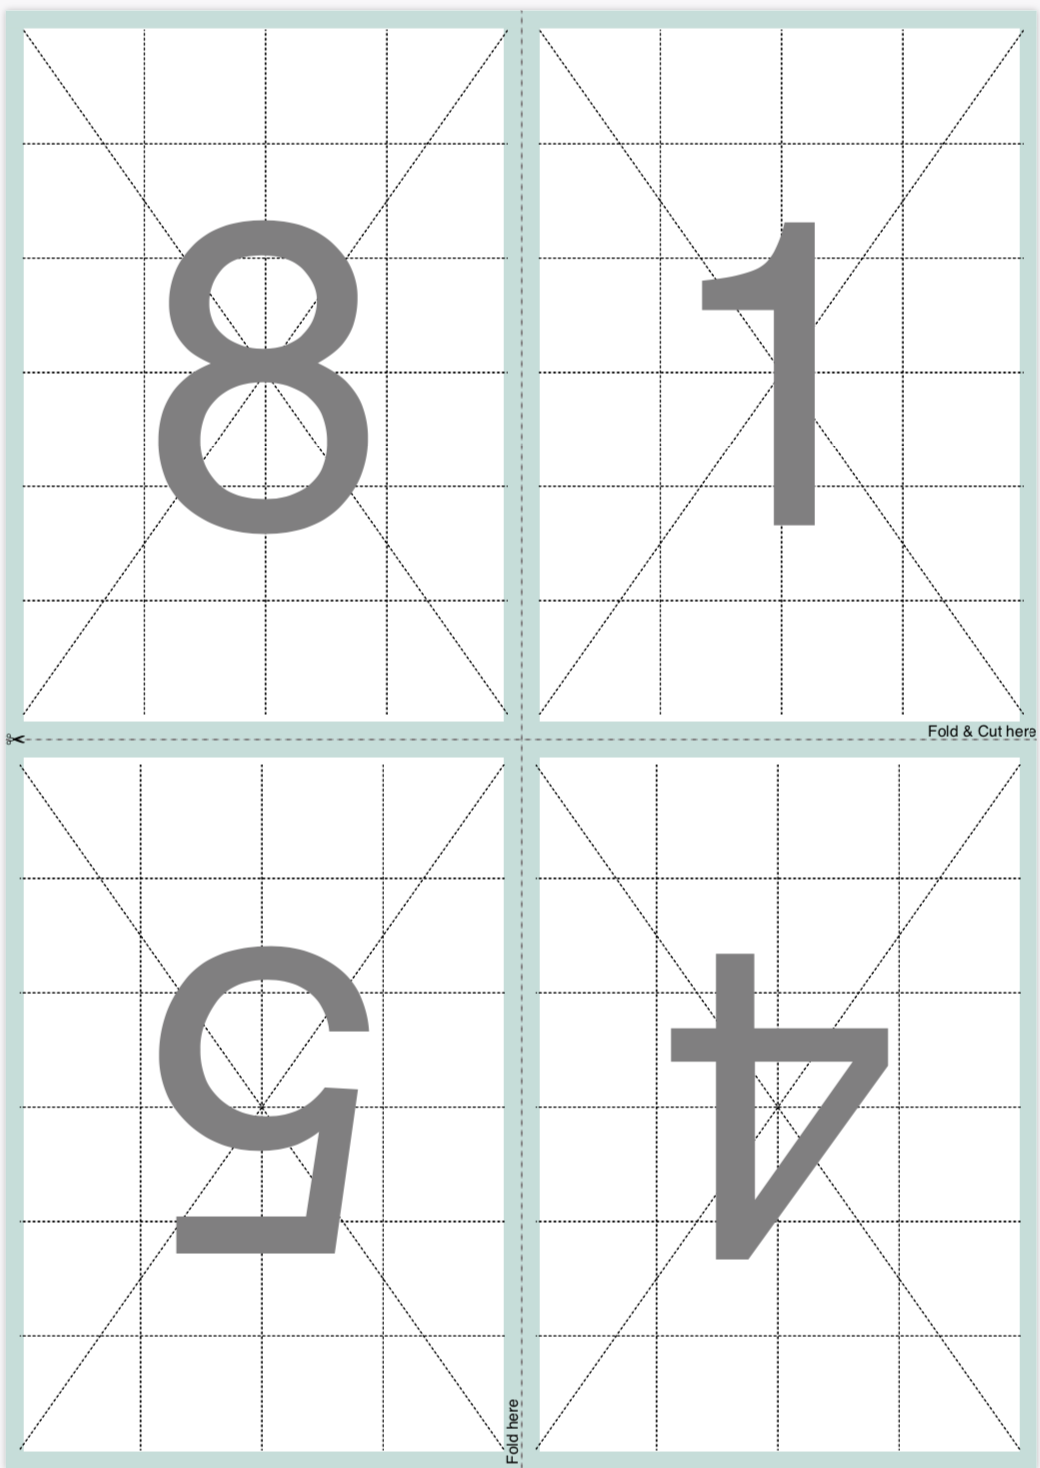
Booklet from image files
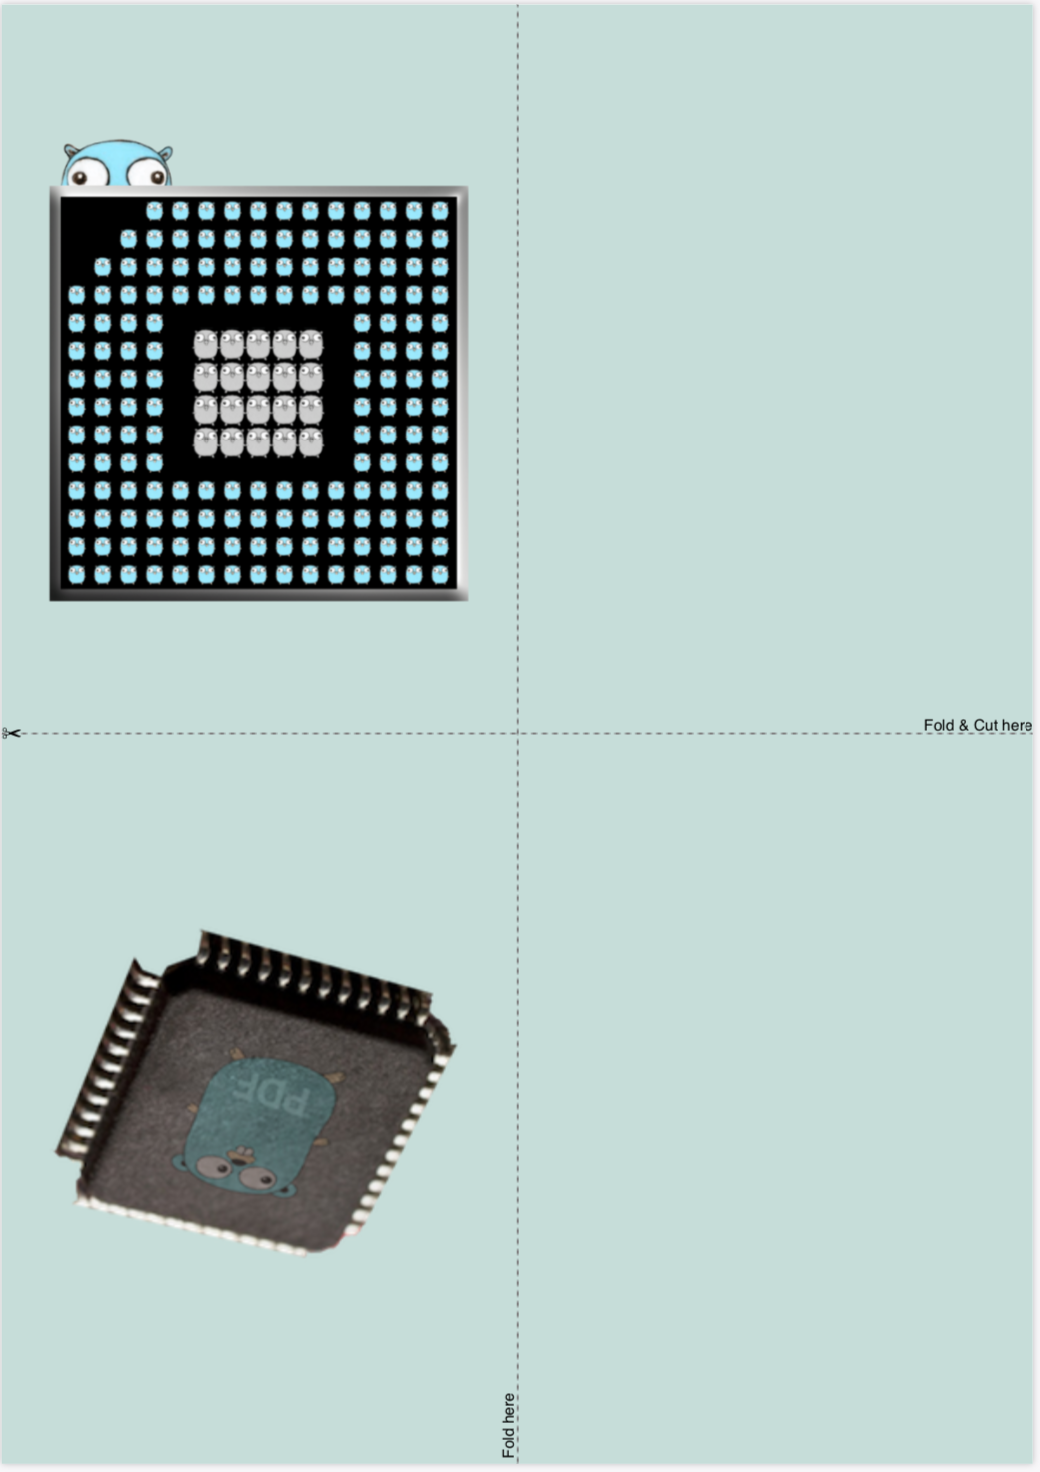
Similar to nup and grid the booklet command also accepts a sequence of image files instead of a PDF input file. In this case pdfcpu applies the same logic as above treating each image as a booklet page:
$ pdfcpu booklet -- "p:A4, g:on, ma:25, bgcol:#beded9" bookletFromImages.pdf 4 *.png
In the following example we have five input image files resulting in a booklet with five pages of content.
Since we want to produce a 4-up booklet we can fit eight booklet pages on one sheet of paper.
As a result of this pages 6 thru 8 are rendered as empty pages.
Here are all pages (1 and 2) of the output file bookletFromImages.pdf:

Booklet with folios/signatures
- You bind your paper in eight sheet folios each making up 32 pages of your book.
- Each sheet is going to make four pages of your book, gets printed on both sides and folded in half.
- For such a multi folio booklet set ‘multifolio:on’ and play around with ‘foliosize’ which defaults to 8.
$ pdfcpu booklet -- "p:A4, multifolio:on, foliosize:8" hardbackbook.pdf 2 in.pdf